Safe Canning Tips

Just because grandmaw did it that way doesn’t mean it’s the correct way to do it now.

Now don’t get me wrong here, I ain’t dissin’ your grandmaw. I’m sure your granny was a wonderful lady. Mine sure was. But, just because she did something a certain way, doesn’t necessarily mean you should. We have access to technology, testing, and good old science that our grannies didn’t.

  • Hey! My grandmaw did it THIS way and she never killed anyone.
    That you know about. While we can’t go back in time and prove it there has been speculation that mysterious deaths in the past could have been caused by canned foods that were not safe. We have many more years of knowledge that she didn’t have available to her. How about let’s go with the scientists here?
  • You can boil green beans for 3 hours and they’ll be safe.
    No. Actually you can’t be sure of that. You might get lucky. You might poison someone. Research tells us that it would take more than 12 hours in a boiling water bath to ensure their safety. For the record: I’m not eating green beans you BWBathed. And I’m not letting my family eat them. And I’m going to discourage your family from eating them.
  • Dry canning is safe.
    What do you mean by “dry canning”? If you mean putting dry foods in jars, putting lids on those jars and putting it all in the oven – um, probably not a great idea. Canning jars aren’t supposed to go in an oven. The glass isn’t meant for that dry heat – it can shatter! The newest recommendations for lids is to not even simmer them, much less throw them in a hot oven! If, by “dry canning”, you mean vacuum sealing with something like a FoodSaver – yeah you can do that.
  • You should turn your jars upside down after processing to make sure they seal.
    No. Not really. Even where this is written down as an approved method, it is said to be questionable. You are dealing with the safety of your family here, not to mention yourself, do you really want to take a chance? We know that turning jars upside down can allow food to get between the rim of the jar and the lid and cause a seal failure.
  • My granny left the rings on her jars, why should I take mine off? Just because you say so?
    Not just because I say so. How about three reasons? One, and most important, is that the ring can hide from you an unsealed jar and you may not know it’s spoiled – the ring can hold that lid down. Two, hygiene, pure and simple – there is frequently foodstuffs under those rings and: eww. Three is money. If you remove your rings you can wash them and reuse them for your next round of canning.
  • I’ve got a big family and I’m going to can my green beans in half-gallon jars. It’s ok because I’m using a pressure canner, right?
    Just because you are using a pressure canner, does that mean that the heat has reached all the way to the middle of those big jars and has been hot enough long enough to kill everything that could kill you? You can’t be sure. Only high-acid juices are approved for canning in half-gallon jars.
  • About that heat reaching the middle of the jars thing . . . is this why pumpkin puree is not safe? I don’t need a half-gallon of that!
    Pumpkin puree is very dense though, isn’t it? I mean when we dump it out of a commercial can, it pretty much sits there without slumping, doesn’t it? It’s so thick and dense that the heat can’t get through to all areas of the jar – leaving some areas under processed and unsafe.
  • I’ve got this great recipe that’s been handed down in the family. I’m going to can that!
    Has it been tested so that you know how long to can it to make it safe? I didn’t think so. Maybe you should reconsider and use only tested recipes.
  • I’m going to do it the time-honoured, traditional way!
    You can also speed and maybe you don’t get a ticket. I don’t recommend it; eventually the Officer Botulism will catch you.

I recommend going to the website of the National Center for Home Food Preservation. They are the ones who do the testing, after all.

Three-pressure Canner Weight Sets

Tired of babysitting your pressure canner? Buy a three-pressure weight!

Traditional dial-gauge canners require you to baby-sit them and continually adjust the heat to maintain the pressure. You’ll think you have it correct and then it’ll start climbing again! Or worse, it’ll drop and you have to start all over, possibly turning your food to mush. All that fluctuating pressure can lead to your liquid syphoning out of your jars. A three-pressure weight set will help! It’s much easier to listen to the weight jiggle while you are cleaning up the kitchen – or sitting on the couch. With a three-pressure weight set, the the exact heat setting under the canner isn’t quite so critical, so it’s much easier to maintain. A more even pressure keeps the syphoning to a minimum. Did I mention you can sit on the couch?

Mirro

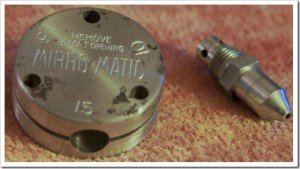
Mirro's version of the 3-pressure weight set.Mirro has shipped with its canners for years a weight that is capable of the three different pressures that the USDA requires for the definition of a canner. Presto and All-American haven’t always done this. I do not have any [easyazon-link asin=”B000RNH7PQ” locale=”us”]Mirro canners[/easyazon-link], but it is my understanding that the newest ones are shipping with three separate weights rather than the [easyazon-link asin=”B000U7QEXK” locale=”us”]“hockey-puck” style[/easyazon-link] shown here. This hockey-puck style weight “jiggles” every few seconds to maintain the proper pressure.

All-American

All-American’s older models shipped without a three-pressure weight. You had to constantly adjust the heat of your burner under your canner to maintain the proper pressure according to the dial-gauge.

Their newer canners ship with a [easyazon-link asin=”B000S8I0YC” locale=”us”]weight that is very similar in design[/easyazon-link] to the old Mirro setup. You can buy the parts to retrofit your older model.

This weight also “jiggles” only every few seconds.

Presto

Presto’s traditional weight is a 15 pound regulator. As with the older All-American canners, you had to constantly adjust the heat under your canner to maintain the proper pressure. (Of course, if you need to can at 15 pounds pressure, you can use this weight as-is.) Presto has a a [easyazon-link asin=”B000HMBVQ8″ locale=”us”]three-piece weight set[/easyazon-link] available for its canners. This weight set allows you to choose a set pressure of five, ten or fifteen pounds. The Presto weights will rock gently when you’ve reached your set pressure.

Presto’s Traditional 15 Pound Pressure Weight
One version of Presto's traditional 15 pound weight.

Presto’s Three-piece Weight SetPresto's Three-piece Weight Set

The three-piece weight set, set up for 10 pounds pressure.Presto's three-piece weight set, setup for 10 pounds pressure

The three-piece weight set, set up for 15 pounds pressure.Presto's three-piece weight set, setup for 15 pounds pressure

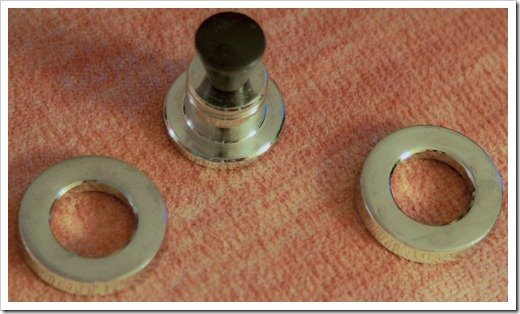
This is the Mirro version of the Presto three-piece weight set. All-American’s weight is very similar to this.Mirro's 3 pressure weight and vent tube.

A brief video of the Presto three-piece weight set in action:

The traditional Presto 15lb weight:[easyazon-image align=”center” asin=”B0014IGAPG” locale=”us” height=”160″ src=”http://ecx.images-amazon.com/images/I/41kPPh0W2mL._SL160_.jpg” width=”130″]

[easyazon-cta align=”center” asin=”B0014IGAPG” height=”28″ key=”amazon-us-small-orange” locale=”us” width=”120″]

The Presto 3-pressure weight set: [easyazon-image align=”center” asin=”B000HMBVQ8″ locale=”us” height=”160″ src=”http://ecx.images-amazon.com/images/I/3121uUIqs5L._SL160_.jpg” width=”158″]

[easyazon-cta align=”center” asin=”B000HMBVQ8″ height=”28″ key=”amazon-us-small-orange” locale=”us” width=”120″]

The Mirro 3-pressure weight: [easyazon-image align=”center” asin=”B000U7QEXK” locale=”us” height=”160″ src=”http://ecx.images-amazon.com/images/I/4129R14HtzL._SL160_.jpg” width=”160″] [easyazon-cta align=”center” asin=”B000U7QEXK” height=”28″ key=”amazon-us-small-orange” locale=”us” width=”120″] The All-American 3-pressure weight: [easyazon-image align=”center” asin=”B000S8I0YC” locale=”us” height=”160″ src=”http://ecx.images-amazon.com/images/I/51RkoxAYaWL._SL160_.jpg” width=”160″] [easyazon-cta align=”center” asin=”B000S8I0YC” height=”28″ key=”amazon-us-small-orange” locale=”us” width=”120″]

Jim’s List of Essential Canning Tools

What do you need to do some major canning? Here are my suggestions for a happy canning experience.

  1. A Stainless Steel Canning Funnel
    [easyazon-image align=”right” asin=”B00004UE88″ locale=”us” height=”115″ src=”http://ecx.images-amazon.com/images/I/41H8B03T3PL._SL160_.jpg” width=”160″]A [easyazon-link asin=”B00004UE88″ locale=”us”]canning funnel[/easyazon-link] is a requirement to easily transfer foods into a jar. Sure you can go with plastic, but stainless will hold up better and isn’t going to melt if you get it too close to a hot burner.

  2. A Jar Lifter
    [easyazon-image align=”right” asin=”B007QT4GM6″ locale=”us” height=”160″ src=”http://ecx.images-amazon.com/images/I/41HLBRZCB0L._SL160_.jpg” width=”108″]You don’t want to try to lift hot jars out of a pot of boiling water by hand, do you? A [easyazon-link keywords=”jar-lifter” locale=”us”]jar-lifter[/easyazon-link] will let you grab those jars without burning your hands.

  3. Commercial-Grade Stainless Steel Ladles
    [easyazon-image align=”right” asin=”B008K3Z76Q” locale=”us” height=”110″ src=”http://ecx.images-amazon.com/images/I/31EzsaG-%2BVL._SL110_.jpg” width=”110″]You want a [easyazon-link keywords=”nsf stainless ladle” locale=”us”]ladle with a long handle[/easyazon-link] so that you can get into large stockpots. Most ladles made for home use are way to short for this task and don’t hold anywhere near enough. You can find [easyazon-link keywords=”32 oz ladle” locale=”us”]quart-sized commercial ladles[/easyazon-link]. I find myself using an [easyazon-link keywords=”8 oz stainless ladle” locale=”us”]8 oz stainless[/easyazon-link], NSF-approved ladle I picked up at a local restaurant-supply store. If you are only canning small jars, you may find a [easyazon-link keywords=”4 oz stainless ladle” locale=”us”]4 oz[/easyazon-link] or [easyazon-link keywords=”6 oz stainless ladle” locale=”us”]6 oz[/easyazon-link] ladle more appropriate.

  4. Large Stainless Stockpots – induction capable
    [easyazon-image align=”right” asin=”B000ZMHDRQ” locale=”us” height=”82″ src=”http://ecx.images-amazon.com/images/I/2176Dek6DtL._SL110_.jpg” width=”110″]You can cook a small amount of something in a large pot, but you’ll not be cooking a large amount in a tiny pot! If you were to go for a [easyazon-link keywords=”22 quart stainless stock pot” locale=”us”]22 quart stockpot[/easyazon-link] (a common size), it could do double-duty as a boiling-water-bath canner. I suggest an [easyazon-link keywords=”induction cookware” locale=”us”]induction-capable pot[/easyazon-link] because induction technology seems to be becoming very popular and your next stove-top may be induction. Also, many people buy hotplates to help out in the kitchen during canning season – there are several [easyazon-link keywords=”induction” locale=”us”]portable induction burners[/easyazon-link] on the market these days.

  5. Commercial-Grade Stainless Steel Spoons
    [easyazon-image align=”right” asin=”B00915HNZK” locale=”us” height=”110″ src=”http://ecx.images-amazon.com/images/I/31YiLxZu8RL._SL110_.jpg” width=”110″]Again with the commercial thing? Why do I need a [easyazon-link keywords=”commercial spoon stainless professional” locale=”us”]commercial spoon[/easyazon-link]? Because they have the long handles to get to the bottom of a tall stockpot.

  6. Stainless Steel Skimmer
    [easyazon-image align=”right” asin=”B000P9TKC0″ locale=”us” height=”58″ src=”http://ecx.images-amazon.com/images/I/31uju5z%2BTlL._SL160_.jpg” width=”160″]When canning, you frequently want to distribute the solids out of a pot of soup evenly between jars, or only have a jar half-ful of solids before topping-off with broth. The easiest way I’ve found to do this is with a [easyazon-link asin=”B000P9TKC0″ locale=”us”]skimmer[/easyazon-link]. If you are fan of deep-frying, perhaps you already have one lying about the house?

  7. Stainless Steel Colanders
    [easyazon-image align=”right” asin=”B00555ETXY” locale=”us” height=”68″ src=”http://ecx.images-amazon.com/images/I/41eVkUNRBJL._SL110_.jpg” width=”110″]A couple [easyazon-link keywords=”stainless colander” locale=”us”]large colanders[/easyazon-link] make rinsing large quantities of vegetables much easier! If you have a steam juicer, you should probably just grab the colander out of the top if it.

  8. Stainless Steel Steam Juicer
    [easyazon-image align=”right” asin=”B0002IBQL2″ locale=”us” height=”110″ src=”http://ecx.images-amazon.com/images/I/416lluf6DBL._SL110_.jpg” width=”110″]The best invention for clear jellies, the [easyazon-link keywords=”stainless steam juicer” locale=”us”]steam juicer[/easyazon-link] also is great for removing water from tomatoes or preparing apples for apple sauce. The large colander can be used for straining anything, or with the [easyazon-link asin=”B0002IBQL2″ locale=”us”]Krona model[/easyazon-link] can be used as a normal steamer. A [easyazon-link keywords=”stainless steam juicer” locale=”us”]steam juicer[/easyazon-link] consists of 5 parts: A water pan on the bottom, A collection pan, with spout, above the water pan, A colander into which you place your product, A lid sitting on top of all, and a heat-proof hose attached to the collection pan’s spout, for draining-off your juice.

  9. A food mill or berry-press attachment for your stand mixer
    [easyazon-image align=”right” asin=”B00004SGFJ” locale=”us” height=”110″ src=”http://ecx.images-amazon.com/images/I/311qb72yfJL._SL110_.jpg” width=”110″]How do you remove all the seeds and peels from the produce you’ve just run through your steam juicer? Hook up a press attachment to your [easyazon-link asin=”B00004SGFJ” locale=”us”]Kitchen Aid[/easyazon-link], Bosch or Assistent stand mixers.

  10. Pressure Canners
    [easyazon-image align=”right” asin=”B00004S88Z” locale=”us” height=”110″ src=”http://ecx.images-amazon.com/images/I/41hC%2BsFPoBL._SL110_.jpg” width=”97″]Canners? Plural? Why would you need more than one canner? And what about water bath canners?I feel a tall [easyazon-link keywords=”pressure canner” locale=”us”]pressure canner[/easyazon-link] is a must unless you have need of a small canner. A tall [easyazon-link keywords=”pressure canner” locale=”us”]pressure canner[/easyazon-link] is one that is 21 quarts by volume or greater. It will be tall enough to do two layers of pint jars as well as be used as a boiling water bath canner.[easyazon-link keywords=”Presto pressure canner” locale=”us”]Presto[/easyazon-link], [easyazon-link keywords=”Mirro pressure canner” locale=”us”]Mirro[/easyazon-link] and [easyazon-link keywords=”All-American pressure canner” locale=”us”]All-American[/easyazon-link] all make 21 quart, or larger, pressure canners. I suggest more than one canner if you are doing large batches. You can start a second canner-load as soon as the first has finished its time, or you can have two canners going at once.

Presto 21-B Pressure Canner Manual

Operating instructions for Presto’s 21-B canner.

While this manual originally came with a 21-B, it can be used for the 16 quart model as well. It includes recipes and canning times. As this is a vintage manual, please take into account that the currently-recommended canning times may have changed. The University of Georgia’s Center for Home Food Preservation is a great resource with USDA recommendations.

Models known to be compatible with this manual: 21-B, 16A, and 21A.

Click the link to see the manual in Adobe’s PDF format:
21-B Pressure Canner Manual